Card Recon 3.0.1
Setting Up a Windows Virtual Machine
Setting up a Windows virtual machine (VM) will allow you to run the Card Recon GUI to create and save configuration files for use on the Card Recon CLI.
To begin setting up a Windows VM, you will need to run virtualization software.
Go to VirtualBox’s downloads section to download a copy of VirtualBox: https://www.virtualbox.org/wiki/Downloads
Install VirtualBox by running the installer and following the on-screen instructions.
For more information on installing VirtualBox, please consult the VirtualBox end-user documentation.
System Requirements
To run VirtualBox, your host machine will need:
- A recent Intel or AMD processor.
- At least 1GB RAM.
- 8GB free disk space.
- A host operating system that is supported by VirtualBox.
- A supported guest operating system (in this case, Windows).
Download Windows VM
Microsoft makes its platforms available as VMs for testing purposes here: https://developer.microsoft.com/en-us/windows/downloads/virtual-machines/
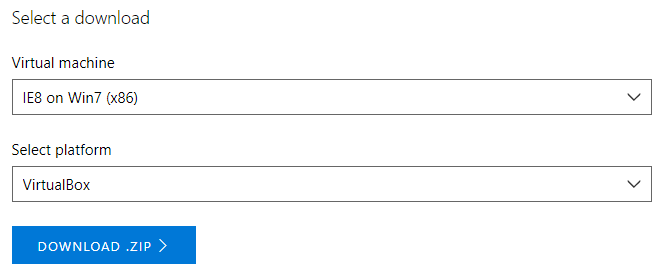
On Microsoft’s "Download virtual machines page" :
- Select an appropriate version of Windows to run the Card Recon GUI on.
- Select the appropriate platform (the virtualization software that the VM will run on, i.e. VirtualBox).
Click on the Download .zip button that appears on the right.

Installing the Virtual Machine
- Make sure that VirtualBox is installed.
- Locate the downloaded Windows VM *.zip file. Extract the virtual appliance file.
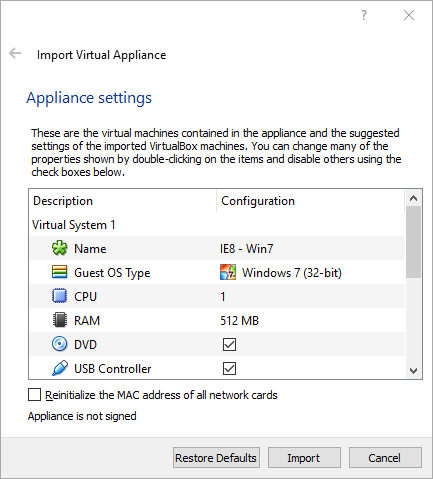
- Double-click the extracted virtual appliance file (*.ova).
VirtualBox opens and displays the "Import Virtual Appliance" dialog.

- Click Import to start building the Windows VM.
When VirtualBox is done building the Windows VM, the "Import Virtual Appliance" dialog will automatically close.
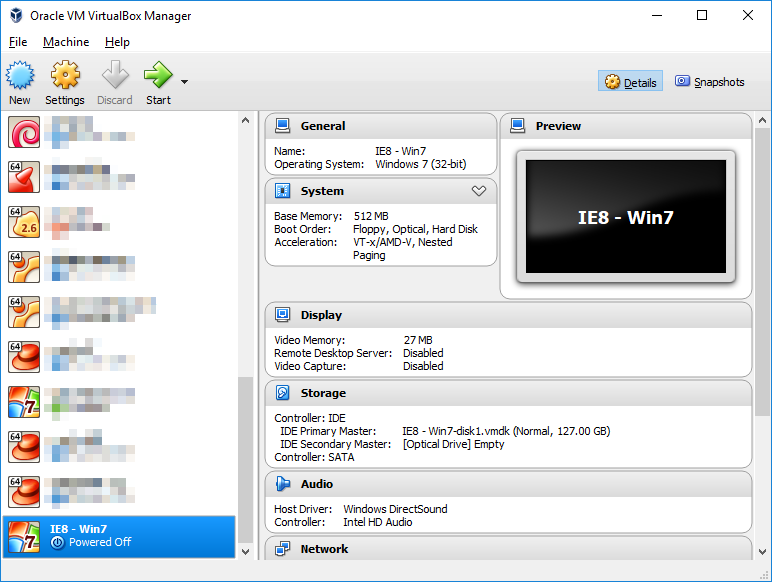
The Windows VM will display in the Oracle VM VirtualBox Manager.

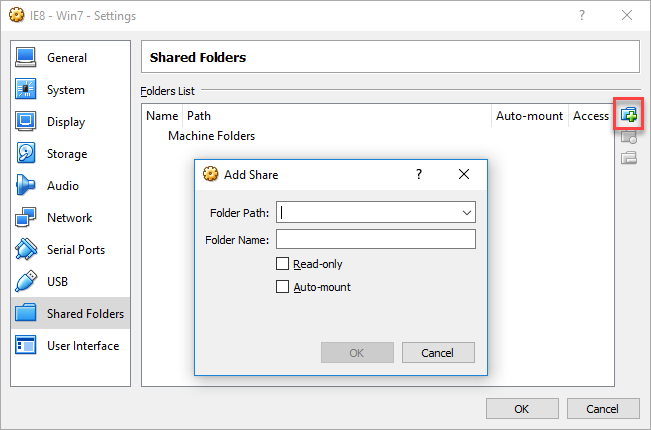
To share folders between your host machine and the Windows VM, right-click the Windows VM in the Oracle VM VirtualBox Manager and select Settings.

Select Shared Folders in the left panel. Click on the Add shared folder button on the right of the window
Enter the path of a folder on your host machine to share with the Windows VM.
Click Start to start the Windows VM.
Download and run the Card Recon GUI on the Windows VM to begin creating and managing your configuration files.
Third-party Software Disclaimer
Any links to third-party software available on this website are provided "as is" without warranty of any kind, either expressed or implied and such software is to be used at your own risk.
The use of the third-party software links on this website is done at your own discretion and risk and with agreement that you will be solely responsible for any damage to your computer system or loss of data that results from such activities. Ground Labs will not be liable for any damages that you may suffer with downloading, installing, using, modifying or distributing such software. No advice or information, whether oral or written, obtained by you from us or from this website shall create any warranty for the software.
Ground Labs does not provide support for these third-party products. If you have a question regarding the use of any of these items, which is not addressed by the documentation, you should contact the respective third-party item owner.